
COURSE OUTLINE
KINDLY SCROLL AND READ, BROADEN, OR DOWNLOAD THE FILES BELOW
GEOMETRY HANDOUT
UNIT ONE
PLANE GEOMETRY - PATTERNS IN SHAPES
(LEARNING, TEACHING, AND APPLYING)
PART ONE
Starters: My dear students let’s begin this lesson by using the following warm-up activities.
a. How do you relate the following below to real-life situations using examples?
(Group discussions)
v Lines and Angles
v 3-Dimensional shapes
v 2-Dimensional shapes etc.
b. Study the table below and do the following activities within the big square enclosed by red lines.
September 2011
S | M | T | W | T | F | S |
|
|
|
| 1 | 2 | 3 |
4 | 5 | 6 | 7 | 8 | 9 | 10 |
11 | 12 | 13 | 14 | 15 | 16 | 17 |
18 | 19 | 20 | 21 | 22 | 23 | 24 |
25 | 26 | 27 | 28 | 29 | 30 |
|
The sum of these three numbers 1, 9, and 17 taken from the red square in the calendar is 27.
1. From the red square in the calendar, find another set of three numbers whose sum is 27.
2. How many sets of three numbers taken from the square in the calendar have the sum 27?
PART TWO
ANGLES AT A POINT, ANGLES, AND PARALLEL LINES
ANGLES
What is an angle?
An angle is formed when two rays originate from a common point called a vertex. OR an angle is formed when there is a change in direction. Eg. angle XOY ie.<XOY.

An angle can also be defined as an amount of tuning made about a point. Eg Door rotates through the hinges which represent a vertex and the angle is formed around the hinge.ie.between the door and the wall.
Types of angles
Dear students, let’s also look at some of the types of angle and their examples.
Ø Acute angle ( 0o < acute < 90o)
An acute angle is an angle less than 900
Eg. 400, 890,30 etc
Ø Obtuse angle (90o < obtuse < 180o)
This is an angle which is greater than 900 but less than 1800
Eg 90.50,1270, 1730 etc.
Ø Reflect angle ( 180o < reflect < 360o)
This angle is greater than 1800 but less than 3600
Eg. 1810,2590,3200etc
Ø Right angle – 90o ie. quarter turn.
This angle is equal to 900
Ø Straight angle – 180o ie. half turn.
This angle is equal to 1800
Ø Revolution – 360o ie. complete turn.
This angle is equal to 3600
Angle properties of Parallel lines
Dear students, here we are coming to discuss the relationship between certain pairs of angles.
Many angles are formed when a transversal line crosses two or more parallel lines as shown below.

Ø Adjacent angles –Two angles are said to be adjacent if they have a common side with a common vertex. They add up to 180o e.g. (p & m)
Ø Vertically opposite angles –. They are pair of angles which are equal. Eg.u and x, p and n, m and q, etc.
Ø Corresponding angles. They are pair of angles which are equal. eg (m, u) and (n, v)
Ø Alternate angles. They are pair of angles which are equal. eg. (p, v)
Ø Co – interior angles or interior opposite angles –add up to 180o
Eg. p+u =1800 also v and q will give 1800
Ø Complementary angles –Two angles which add up to 900
Ø Supplementary – Two angles which add up to 180o.
Examples
Find the angle marked b in the figure below.

Solution
To find the angle b we construct a parallel line through the vertex of angle b.

b = x + y
x + 160 = 180 co - interior <s
x = 180 – 160 = 20
y = 30alt <s
a = 20 + 30 = 50o
PART THREE
Tutorial Questions
Dear students, you are welcome back to part three of this lesson where you are also given the opportunity to try your hands on some of the questions related to the topic.
1. Find the values of x in the figures below.

2. Find the values of the angles marked with letters.


3. In the diagram FLQ, GRM, PQRS and KLMN are straight lines <FLM = 120o, < LMR =85o, < GRS = 95o and < LQR = x.

PART FOUR
POLYGONS
Dear students, you are welcome to part four of this presentation which deals with polygons and their properties.
Starter :
a. How many squares are in this diagram?

POLYGONS
Plane Geometry can be bounded entirely by a number of lines ranging from three onwards such plane figures are called polygons. Triangles are bounded by three straight lines and quadrilaterals are bounded by four straight lines and so on. Polygons have names depending on the number of straight lines they are bounded by. Alternatively, polygons are closed plane shapes bounded by line segments.
The Greek alphabet
Names | Number of sides |
Triangle | 3 |
Quadrilateral | 4 |
Pentagon | 5 |
Hexagon | 6 |
Heptagon | 7 |
Octagon | 8 |
Nonagon | 9 |
Decagon | 10 |
Duo-decagon | 12 |
Properties of Triangles

TRIANGLES AND QUADRILATERALS
Dear students let’s continue with the types of triangle and quadrilateral and their properties
Types of triangles
The Equilateral Triangle
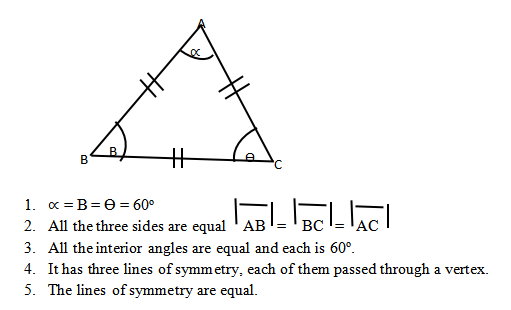
Isosceles Triangle.

1. Two sides are equal in length.
2. It has two equal angles. Each of them is opposite to equal sides meaning yo = zo because |AB| = |AC|
Scalene Triangle

1. All the three sides are unequal.
2. No line of symmetry
3. Different interior angles
Right-angled Triangle

It is the triangle in which one of the interior angles is a right angle i.e. 90o. The side that faces the right angle is the longest of all the three sides and it is called hypotenuse. The other two angles are complementary.
x + y + 90o = 180o
x + y = 180o – 90o
x + y = 90o
Find the values of the angles marked in the following figures.

Trapezium

a) A trapezium is a quadrilateral with one of the pairs of the opposite sides parallel to each other.
AB=DC
b) The perpendicular distance between the parallel sides is called the altitude of the trapezium.
Parallelogram

Rectangle

a) It has two pairs of opposite sides parallel and equal in length.
b) All the four pairs of adjacent sides meet at right angles.
c) It has two lines of symmetry.
d) Each interior angle is 90o.
e) The diagonals bisect each other at 90o.
Rhombus

a) Both pairs of opposite angles are equal.
b) Both pairs of opposite sides parallel to each other.
c) All of the four sides are of equal length.
d) The diagonal bisect each other at 90o.
Square

a) All the four sides are equal and the two pairs of opposite sides parallel to each other.
b) The diagonals bisect each other at 90o.
c) The diagonals are of equal length.
d) Each of the four internal angles is 90o.
Kite

a) None of the opposite sides are parallel.
b) The diagonals intersect at right angles and one side is longer than the other.
c) Only one pair of the opposite angles are equal

Try to fold the papers of different shapes along different lines and see if you could get congruent planes.

All the dotted lines are lines of symmetry.
PART FIVE
Angles property of polygons
Dear students, you are welcome back to part five of this lesson.
Finding the sum of interior angles of a polygon.
Steps
Ø Using a metre rule of 30cm.
Ø Draw a sketch of each of the polygon.
Ø Take note of the number of sides of the polygons
Ø Note the polygon with the least number of sides i.e. 3 sides
Ø Revise the sum of the interior angles of a triangle i.e. 180o.
Ø
Dissect each by drawing non-intersecting diagonals for e.g

E.g 1. Find the sum of interior angles of a 12 sided polygon.
n = 12
![]() s = 180o (12 – 2)
s = 180o (12 – 2)
= 180o x 10
= 1800o
E.g 2. The interior angle of a pentagon are 4ᵶ, 100o, 110o, (2ᵶ + 6)o and 3ᵶo. What is the value for ᵶ?
4ᵶ + 100 + 2 ᵶ + 6 + 3ᵶ + 110o = 180 (5 – 2)
9ᵶ + 216o = 180 x 3
9ᵶ = 540 – 216
9ᵶ = 324

ᵶ = 36o.
Exterior angle of a polygon
Using the cutting and arranging of exterior angles.
Steps
Ø Draw the polygon and their exterior angles on a sheet of paper.
Ø Cut out the exterior angles.
Ø Arrange them by placing the straight edges of the angles side by side.
Ø The shape formed by the arrangement is a circle.
Ø The angle formed by a circle is 360o.
.![]() The exterior angle of any polygon adds up to 360o.
The exterior angle of any polygon adds up to 360o.

E .g 1. Find the value of x in the figure below.

The sum of the exterior angles is 360o.
X + 2x + 3x + 4x + 5x = 360o.
15x = 360

X = 24o
The Interior angle of a regular polygon
Every exterior angle of a polygon is supplementary to another angle inside the polygon. The angles inside the polygon are called interior angles. The number of sides of any polygon is equal to the number of interior angles. Therefore the interior angle of a regular polygon which is a polygon with all the sides being equal and all the interior angles being the same is given by

WORKED EXAMPLES
The sum of the interior angles of a polygon is 2160o. Find the number of the polygon.
Solutions
The Sum of interior angles of a regular polygon is (n – 2) 180o, where n is the number of sides
→ (n – 2) 180o = 2160o
→ 180on – 360o = 2160o
→ 180o n = 2160o + 360o
→ 180o n = 2520o

Hence the polygon has 14 sides.
An exterior angle of a regular polygon is 30o. Find the number of sides of the polygon.
Solution

Alternatively

TUTORIAL QUESTIONS
Dear students, you are all welcome to this part of the presentation where you required in finding solutions to the following problems
1.a) Find the value of x in the figure below.

b) calculate the number of sides of the following angles of an interior polygon
i) 60o
ii) 90o
1. What is the value of y?

2. An interior angle of a regular polygon of n sides is 140o. What is the value of n?
3. Three of the interior angles of a hexagon are xo each. The other three angles are 2xo each. Find the value of x.
4. The sum of interior angles of a given polygon is 1620o. Find the number of sides of the polygon.
5. A regular polygon has 10 sides. Find
The exterior angle.
6. Sum of the interior angles.
7. The interior angle of a regular polygon is two-thirds of its exterior angle. Find the number of sides.
UNIT TWO
GEOMETRICAL CONSTRUCTIONS
(LEARNING, TEACHING, AND APPLYING)
PART ONE
Starters: My dear students let’s begin this lesson using the following warm-up activities
A match is 3cm long. It makes 16 matches to make a track 15cm long and 3cm wide as in

How many matches does it take to make a similar track of 90cm long and 3cm wide?
PART TWO
GEOMETRICAL CONSTRUCTIONS
Dear Student, you are welcome to the second part of this lesson which deals with geometrical construction.
The following geometrical Instruments enable us to do constructions effectively. This includes a ruler, a pair of compasses, two set squares, a pair of dividers, and a protractor.
Construction of lines and angle bisectors
Bisecting a line.
A line that is perpendicular to a line at its midpoint is called the perpendicular bisector of a line segment.
Steps
1.Open the pair of compass span more than half of the distance P to Q. Then with the compass point at P draw an arc in each half-plane.
2.With the same compass radius, place the compass point at Q and draw arc each in each half – plane to intersect with the arcs in step 1.
3.Use a straight edge or a ruler to draw line AB and label it intersection with line PQ as point M.

Bisecting an angle
Steps
Place the compass point at P, the vertex of the two rays, and draw an arc to cut the two rays label the points where the arc intersects with the rays as A and B.
Place the compass at point A and draw an arc to the right of the first arc. Repeat the step using point B with the same radius. Label the intersection of two arcs as K.
Draw line PK with a ruler or a straight edge. Line PK is the bisector of angle APB.

Constructing angles 60o, 90o, 30o, and 45o.
Constructing angle 60o
Steps
1.With the ruler (or a straight edge) draw a straight line and mark a point P.
2.With the compass point at P, open the compass to a reasoning radius and draw an arc to cut the line at Q, extending the arc to about a quarter of a circle.
3.Pace the compass point at Q and with the same radius, draw another arc to intersect with the first arc. Label the point of intersection as R.
4.With the ruler (or straight edges) draw a straight line through P and R.

Constructing angle 90o
To construct F angle 90o we may bisect a straight line

Steps
1.With the ruler (or a straight edge) draw a straight line and mark a point P.
2.With the compass point at P open the compass to a reasonable radius and draw a semi-circle. Label the points of the intersection of the line and the semi-circle as A and B.
3.Place the compass point at A and increasing its radius, draw an arc above the semi-circle. Again place the compass point at B and draw another arc to intersect with the first arc maintaining the same radius. Label the point of intersection of the two arcs as T.
4.Use your ruler to draw line TP. Verify by measuring <TPA or <TPB.

Constructing angle 30o. First, construct angle 60o and then bisect it.
Steps
1.Construct angle 60o
2.Place the compass point at R and with a reasonable radius draw an arc to the right of arc RQ. Repeat this with the compass point at Q and with the same radius to intersect with the first arc. Label the intersection as T.
3.Draw line PT using a ruler or straight edge.

Constructing angle 45o
To construct angle 45o, we first construct angle 90o and then bisect it.
Steps
1.Construct 90o. Label the intersection of the line PT and the semi-circle and say C.
2.Place the compass point at C and with a reasonable radius, draw an arc to the left of the arc AC. Repeat the same process with the compass at A and with the same radius to intersect with the first arc label the intersection as D.
3.Draw line PD using a ruler or straight edge. Let pupils recognize line PD as the line which bisects angle 90o i.e. angle TPA. Let pupils verify by measuring either angle APD or angle DPC.

Constructing angles 75o, 105o, 120o, and 135o.
Construction of 75o
To construct angle 75o, we first construct 60o and 90o and then bisect the angle between 60o and 90o.
Steps
1.Construct 90o at point P and label the intersection of the perpendicular line through P and the semi-circle.
2.Construct 60o at point P and label point of intersection of the semi-circle and the 60o line through P.
3.Bisect angle SPR by placing the compass at S and draw an arc outside arc SR with a reasonable radius. Repeat the process with the compass at R with the same radius to intersect the first arc. Label the intersection of the arc as T.

Construction of angle 105o, (120o and 135o)
Steps
Draw a straight line angle. The straight line formed is an angle of 180o. The two angles that sum up to 180o are supplementary angles. Thus we construct angle 75o, the other supplementary are is 105o i.e. < BPR = 75o, < APR = 105o.

Similarly, when we construct 60o, the other supplementary angle is 120o. Thus while the constructed angle RPT is 60o, the supplementary angle SPT is 120.

Similarly, we construct 45o, the other supplementary angle is 135o. Angle APD is 135o angle BPD is 45o.

PART THREE
Hello! Dear Student, welcome back to the third part of this lesson. It deals with the construction of polygons.
2.1 Construction of an Equilateral Triangle
Steps
1.Draw a line and mark point M on it as shown below.
2.With a pencil fixed in a pair of compasses open to a radius of 5cm with the tip of the compasses at point M,
3.Construct an arc on the line and call the intersecting point of the arc and the line N.
4.With the same radius, place the tip of the compass at N and make an arc above the line.
5.Repeat the same step with the same radius, this time with the tip of the compass at M to intersect the first arc.
6.Label the intersecting point of the two arcs O.
7.With a ruler and a pencil draw lines MN and NO to complete the triangle.
8.Verify that triangle MNO is equilateral by measuring the length of the sides.

Construction of an Isosceles triangle
Steps
1.Construct a triangle with sides 5cm, 5cm, and 4cm.
2.Draw a line and mark a point P on it.
3.With a radius of 4cm place the tip of the compass at P mark another point on the line. Call this point R.
4.Open the compass to a radius of 5cm with the tip of the compass at point P. Draw an arc above the line. Repeat this activity with the same radius and the tip of the compass at point R. Call the intersecting point of the two arcs Q.
5.With a ruler, draw the lines PR and RQ to complete the triangle.
6.Verify by measuring the length of the sides of the triangle.

2.3 Construction of a scalene Triangle.
Steps
1.Construct triangle PQR with PQ = 4cm, QR = 5cm and PR = 7cm.
2.Draw line PQ of length 4cm.
3.With a radius of 5cm and the tip of the compass at point Q draw an arc above the line. Change the radius to 7cm and with the tip of the compass at P draw another arc to intersect with the first arc. Label this point R.
4.With a ruler draw lines PR and QR.

Exercises
1.Construct a triangle <ABC with = 60o, <BAC = 60o, AB = BC = AC = 6 cm.
2.Construct triangle PQR PQ = 5cm, QR = 6cm and PR = 7cm
construction of a triangle given Two angles and a side
Construct triangle ABC with AB = 5cm , <ABC = 30o and <BAC = 60o.
Steps
1.Sketch the triangle to see how it looks like.
2.Draw a line more than 5cm and marks a point A on it.
3.With a ruler, measure 5cm and mark point B.
4.At point A, construct angle 60o at point B, construct angle 30o.
5.Draw a line through point A and the arc marking the 60o. Again draw a line through point B and the intersecting arcs marking the 30o. Let these lines meet at point C

Construction of a triangle given two sides and an included angle.
Construct triangle PQR with PQ = 6cm, <QPR = 75o and PR = 4cm.
Steps
1.Sketch the triangle.
2.Draw a line more than 6cm and mark point P on it. Again measure 6cm and mark point Q.
3.At P construct angle 75o. Draw a line of length 4cm through point P and the intersecting point of the two arc marking the 75o.
4.Finally, complete the triangle by drawing a line from Q to join the 4cm line.
5.Label the vertex R.

Exercises
1.Construct triangle ABC with the label AB = 6cm, <45o and < ABC = 60o.
2.Construct an isosceles right triangle with two equal sides of length 6cm.
3.Construct triangle with <RPQ = 60o, PQ = 10cm and PR = 12cm.
Construction of Quadrilaterals eg a square
Construct a square ABCD of side 10cm.
Steps
![]() 1.Construct a line segment AB of length 10cm.
1.Construct a line segment AB of length 10cm.
2.Construct perpendicular at A and B on the same side of AB.
3.With centre A and a radius of 10cm, draw an arc to cut the perpendicular on A at the point D.
4.With centre B and exactly, the same radius, draw an arc to cut the perpendicular on B at the point C.
5.Join C to D.

![]()
![]()
![]()
![]() Construction of a Rectangle
Construction of a Rectangle
Construct a rectangle ABCD with AB = 12cm and BC = 10cm.
Steps
1.Construct a line segment AB of length 12cm.
2.Construct perpendicular at A and B.
3.With the centre A and a radius of 10cm, draw an arc to cut the perpendicular on A at the point D.
4.With the centre B and exactly the same radius, draw an arc to cut the perpendicular on B at the point C.
5.Join C to D.
6.ABCD is the required rectangle.

Construction of a parallelogram
Construct a parallelogram ABCD with AB = 12cm and BC = 10cm and <ABC = 105o, <BAR = 75o.
Steps
1.Construct a line segment AB of length 12cm.
2.Construct ABC = 105o at B.
3.With centre B and radius 10cm, cut BC at C.
4.Using the angle properties of parallelograms, construct angle <BAR = 75o at A i.e. (<DAT = 105o facing the same direction as <ABC).
5.With centre A and radius 10cm cut AR at D.
6.Join C to D.
7.ABCD is the required parallelogram.

Student try.
Construct a quadrilateral ABCD with AB = 12cm, <DAB = 60o, < ABC = 75o, AD = 9cm and BC = 10cm.
Construction of Regular Hexagon.
Construct a regular hexagon of side 3cm.
Steps
1.Draw a circle with centre P and radius 3cm, Mark point A on the circumference.
2.With the same radius of 3cm and the tip of the compass at point A, mark a point B on the circumference.
3.Put the tip of the compass at point B on the circumference and mark point C with the same radius F on the circumference with the same radius.
4.Join the points A, B, C, D, E, and F with a ruler.
5.Erase the circumference of the circle gradually, a regular hexagon of side 3cm is arrived at.

PART FOUR
Dear student, you’re welcome to the final part of this lesson where you are expected to try your hands on the questions below.
TUTORIAL QUESTIONS
a) Construct the following hexagon with the following sides.
1. 2cm
2. 3.5cm
3. 4cm
b) Construct triangle PQR with PQ = 8cm, <QPR = 75o and PR = 4cm.
Bisect lines /PQ/ and /QR/ to meet at O. With O as a centre and radius OP draw a circle to pass through the vertices of the triangle.
i) Measure the radius of the circle.
ii) Find the perimeter of the triangle.
c) Construct a parallelogram ABCD with AB = 10cm and BC = 7.5cm and <ABC = 105o, <BAR = 75o.
THE SUBSEQUENT UNITS WILL SOON BE LOADED...
I want to download it, how would I do.
ReplyDeletePlease y
ReplyDeletePost a Comment
Please, share your thought with us...